Hi Scrappers!
This blog isn't as active as I'd like to to be. Primarily because I'm using my Heart-Paper-Scissors blog more often. I invite you to switch to following my other blog, www.heart-paper-scissors.blogspot.ca, to see what I've been creating and to stay up to date on what's going on with my CTMH business.
See you there!
Susana
Tuesday, 20 November 2012

Sunday, 8 July 2012
Starlight Starbright
You know I love a good challenge. This layout was inspired by the July "It's A Sketchy Challenge" from Canadian Scrapbooker.
 Unfortunately, to be considered for publication, one needs to use at least one Canadian manufacturer on the layout--and I don't have much from Canadian manufacturers. Nor do I know where to stock up. With the demise of most of the LSS in my area and my reliance on online stores, it's very difficult to find Canadian manufacturers for sale. If you know where to get the supplies, please let me know!
I used up the last of my Basic Grey "Boxer" line papers for this page and found they co-ordinated perfectly with the autumn colours of Close To My Heart inks. For the largest star, I tried mixing Perfect Pearl paint with Whit Daisy ink and sprayed the chipboard star. The paint gives the ink a beautiful shimmering effect and makes the star twinkle. I also gave the blue background paper a spray with the same ink and am pleased with the shimmery "milky way" look it gives the page.
The little bird stamp is one of my favourites. It's from a French company (that's French from France, not Quebec) called Studi 2 Mers Creations. I love the bird's crown and usually bling it up. On this layout, I simulated petite pearls with a few dabs of Liquid Applique. I repeated the look on the green floral paper, adding a petite pearl to the flower centres.
I liked this sketch because it didn't call for much journaling. Just a clever title and a line with the names and date are all this page needed.
If you're looking for a good challenge, CS has a sketchy challenge every month. Check it out!

I used up the last of my Basic Grey "Boxer" line papers for this page and found they co-ordinated perfectly with the autumn colours of Close To My Heart inks. For the largest star, I tried mixing Perfect Pearl paint with Whit Daisy ink and sprayed the chipboard star. The paint gives the ink a beautiful shimmering effect and makes the star twinkle. I also gave the blue background paper a spray with the same ink and am pleased with the shimmery "milky way" look it gives the page.
The little bird stamp is one of my favourites. It's from a French company (that's French from France, not Quebec) called Studi 2 Mers Creations. I love the bird's crown and usually bling it up. On this layout, I simulated petite pearls with a few dabs of Liquid Applique. I repeated the look on the green floral paper, adding a petite pearl to the flower centres.
I liked this sketch because it didn't call for much journaling. Just a clever title and a line with the names and date are all this page needed.
If you're looking for a good challenge, CS has a sketchy challenge every month. Check it out!
Friday, 15 June 2012
From a Purple Pumpkin Fan
So, if you've been following this blog, you'll know that I'm a Purple Pumpkin fan. I love the monthly sketch challenges and I really love the awesome buttons from their online store. Today, PP artist Samantha Hauzer is having a HUGE give away!! Yet another reason to love PP! Check it out at Samantha's blog: Me and The Little Rascals.
While we're on the topic, here's my take on the sketch for the monthly challenge.

While we're on the topic, here's my take on the sketch for the monthly challenge.

In addition to the PP buttons (that birdie button is so adorable!) I used the Dotty For You papers from Close To My Heart and added a little sparkle with pearlized spray ink and gems. The stamps are from the CTMH Card Chatter stamp set.
The story behind this page is this: At Scrapfest Oshawa 2011, a bunch of ladies from Saturday Scrappers met up. We had our photo taken by Sue Sykes of Canadian Scrapbooker fame and all of us went home with a free print! I finally got around to scrapping the photo at the last club meeting.
I'm really pleased with the way this page turned out and it will be one of the treasured few from 2011 that actually have me in the photo!
Saturday, 2 June 2012
Celebrate Scrapping!

I like this layout because it's simple and lets the photo shine, but also because I was encouraged to create a fancier title than I might otherwise have. Often when creating titles, just letter stickers on a matted block is as fancy as I'd get. But with such a simple title (just a single number), the sketch suggested layering and adding height.
First I defined the space between the title and journaling with a chevron sticker. Then I layered a piece of cardstock, with a notepaper punched edge over it. I added an artisan label sticker by first sticking it to a scrap piece of paper then adhering to the layout with Pop Dots. Finally, I added the felt number and wrote in y son's name.
It wasn't even hard to do! That's one of the reasons I love sketches--they challenge you to try things you might not do on your own. And in this case, I'm inspired to take a second look at all my titles from now on to see how I can add a little something to make them just a little more interesting.
Thursday, 22 March 2012
Somebunny Has Been Crafting...
I often have good intentions when it comes to making cards for the holidays. I usually get a batch of handmade Christmas cards done, but as for the other holidays--like Valentine's Day, Canada Day, Thanksgiving and Easter--my success rate is very low.
This year I am inspired/determined to do better. I'm even thinking of getting organised and putting cards/envelopes/dates/names/addresses together in one spot so all I have to do is write a message and mail off the card.
But until then, I will continue having days like today. The Scrapbooks Etc newsletter arrived in my inbox and when I clicked on it I saw a link to Easy Easter Cards. That sounded just right to me. So I clicked and browsed and thought the "Play with Colour" card is just about the cutest Easter card I've ever seen. Then I remembered some Beatrix Potter Silhouette images I'd purchased last year and used on my Easter scrapbook pages.
So, with just an ink jet printer, leftover scraps and some ink, I quickly put together six of these cards:
 Now, I did have some help. My youngest son inked the edges of the "Happy Easter" strips and stamped a basket image on the envelopes. I don't think it made the process go any faster, but it was a lot of fun crafting with him and seeing his little hands turning chocolate brown. And the odd little fingerprints on the cards just make them that much more special (at least to me).
Now, if you don't receive one of these cute little missives, fret not; National Scrapbooking Day is coming up in May. And you KNOW that's something I'm going to celebrate!!
This year I am inspired/determined to do better. I'm even thinking of getting organised and putting cards/envelopes/dates/names/addresses together in one spot so all I have to do is write a message and mail off the card.
But until then, I will continue having days like today. The Scrapbooks Etc newsletter arrived in my inbox and when I clicked on it I saw a link to Easy Easter Cards. That sounded just right to me. So I clicked and browsed and thought the "Play with Colour" card is just about the cutest Easter card I've ever seen. Then I remembered some Beatrix Potter Silhouette images I'd purchased last year and used on my Easter scrapbook pages.
So, with just an ink jet printer, leftover scraps and some ink, I quickly put together six of these cards:

Now, if you don't receive one of these cute little missives, fret not; National Scrapbooking Day is coming up in May. And you KNOW that's something I'm going to celebrate!!
Monday, 12 March 2012
Creative Foundations
OOOHHHH!!! So exciting!!
If you've ever heard me talk about scrapping, you've probably heard me talk about my crush on Vicki Boutin. I've been a fan of hers for years and her work is really what inspired me to take my own scrapping to the next level by expanding my use of techniques and exploring my own creativity. I had the pleasure of meeting her when I took a class with her at Scrapfest in 2010 and even had my page about Scrapfest (with a pic of her, of course) published in Canadian Scrapbooker!
But what I'm excited about today, is the giveaway on her blog: http://vickiboutin.typepad.com/. Do the blog hop, collect the words and post the sentence for a chance to win a copy of her new book Creative Foundations.
The phrase is mentioned on a couple of the blogs, but don't stop! Visit each blog! They're beautiful and exciting, with great examples of pages and cards. Definitely worthwhile!!
Happy Hopping!
If you've ever heard me talk about scrapping, you've probably heard me talk about my crush on Vicki Boutin. I've been a fan of hers for years and her work is really what inspired me to take my own scrapping to the next level by expanding my use of techniques and exploring my own creativity. I had the pleasure of meeting her when I took a class with her at Scrapfest in 2010 and even had my page about Scrapfest (with a pic of her, of course) published in Canadian Scrapbooker!
But what I'm excited about today, is the giveaway on her blog: http://vickiboutin.typepad.com/. Do the blog hop, collect the words and post the sentence for a chance to win a copy of her new book Creative Foundations.
The phrase is mentioned on a couple of the blogs, but don't stop! Visit each blog! They're beautiful and exciting, with great examples of pages and cards. Definitely worthwhile!!
Happy Hopping!
Friday, 9 March 2012
The United Colours of Scrapping
Remember Benetton? They were so popular when I was growing up. I think every girl in my class had Colours perfume. But I digress.
This layout put me in mind of Benetton because the products I used on them are from around the world! Literally!

Of course, it's mostly stuff from the US: Bazzil cardstock, Jillibean Soup letters, Cosmo Cricket sticker and Sew Easy twine. But the paint is from Canada and the patterned paper is from Quebec (not sure if it's from a French or Quebec manufactuer, but it's a French paper line...whose name escapes me at the moment...). The pen is Sakura, from Japan. And (drum roll, please) the adorable buttons and doily are from Australia: Purple Pumpkin!
A while back I won a prize pack from Purple Pumpkin and waited eagerly for it to arrive. What a stash! They gave me a generous supply of buttons, doilies, flowers and die cuts. I'm sure I'll be able to use them on at least a dozen pages and cards.
This page was my first time using Purple Pumpkin products--fittingly enough, for the Purple Pumpkin March Sketch Challenge. I've admired them online for a long time, but just never put in an order. Maybe because I don't tend to use a lot of buttons on my layouts. But these fabric covered buttons are amazing! They're vibrant and whimsical. A great addition to my kid pages.
Check out their website for yourself! Purple Pumpkin Store
Happy Scrapping!
This layout put me in mind of Benetton because the products I used on them are from around the world! Literally!

Of course, it's mostly stuff from the US: Bazzil cardstock, Jillibean Soup letters, Cosmo Cricket sticker and Sew Easy twine. But the paint is from Canada and the patterned paper is from Quebec (not sure if it's from a French or Quebec manufactuer, but it's a French paper line...whose name escapes me at the moment...). The pen is Sakura, from Japan. And (drum roll, please) the adorable buttons and doily are from Australia: Purple Pumpkin!
A while back I won a prize pack from Purple Pumpkin and waited eagerly for it to arrive. What a stash! They gave me a generous supply of buttons, doilies, flowers and die cuts. I'm sure I'll be able to use them on at least a dozen pages and cards.
This page was my first time using Purple Pumpkin products--fittingly enough, for the Purple Pumpkin March Sketch Challenge. I've admired them online for a long time, but just never put in an order. Maybe because I don't tend to use a lot of buttons on my layouts. But these fabric covered buttons are amazing! They're vibrant and whimsical. A great addition to my kid pages.
Check out their website for yourself! Purple Pumpkin Store
Happy Scrapping!
Thursday, 8 March 2012
Crafting in the Real World
I've said it before: I'm a dyed-in-the-wool PAPERcrafter. I love paper. Have loved it since childhood.
I remember cutting out paper dolls and making them clothes from Christmas wrapping paper. I remember my first typewriter and the stacks of coloured paper I had for different uses: cream for poetry, gray for reports, blue for short fiction, purple for letters. I remember how delighted I was in high school when I found a box of gift wrap from the 1970's and wrapped the covers of my agenda and notebooks in it. And I'll never forget the stationery stores in Seoul with their neat little packages of 2 sheets of paper and coordinating envelope, the gorgeous handmade rice paper (that I taped to the windows for privacy in my curtain less bedroom) and the overflowing bins of amazing pens and markers.
So, of course, I love scrapbooking with paper. And as my husband will attest to, I have a fantastic stash of patterned paper. If you can name a manufacturer I don't have represented in my scrapbooks or my stash, they're probably not available in Canada. It is a huge stash. A monumental stash. A luxurious, inspiring, overflowing, rainbow, jealousy-inducing stash.
And also, of late, a very (sadly) neglected stash.
I have discovered the world of digital scrapbooking.
I won't say I was dragged kicking and screaming into the virtual scrapbooking world, but it was a prolonged, reluctant courtship--that I'm happy to say has blossomed into a loving and wonderful relationship. I love digital scrapbooking. Almost as much as I love paper.
When I became a Close To My Heart Independent Consultant last February, I decided to finally see what all the fuss was about. I signed up for a Studio J membership.
Now, I'm an avid scrapbooker. I average about 3 or 4 hours a week scrapbooking; more if there's a crop that week. And I get a good 3 to 5 pages done per month. Of course, for me, much of my love for this hobby is about the crafting, not necessarily getting pages done, but it is so very satisfying to have completed projects.
For the past few years, my goal has been to never be more than 2 years behind in my annual scrapbooks. And with effort, I've kept up.
Studio J is going to change all that for me. And I'm thrilled!!
I began working in Studio J in mid-February and to date, I have 17 new double-page layouts in my albums and 3 more on the way. That's 17 pages in 3 weeks. Now, I've done 10 pages in 10 days before--but they weren't the most complicated pages, and at the end of it I'd had enough of scrapping and took a few weeks respite. No so with Studio J! I can't get enough. And it's always there waiting for me.
It's an online application that's really easy to use (which is VERY important for someone ask tech-savvy as me--that is to say, not at all) and I can work on my layouts at bit at a time. This has always been my lament with scrapbooking. That I've needed a good chunk of time (at least 2 hours) to make it worthwhile. After all, the first and last half hours are spent getting everything out and then putting everything back. I continue to long for a scrapbooking space of my own where I can just leave unfinished projects on my worktable and not worry about them. Studio J is the next best thing.
My layouts are always there. I can work on them bit by bit--10 minutes here, 5 minutes there--until they are exactly they way I want them. But honestly, it doesn't really take long to create online at all. Here is one of my favourite Studio J layouts.
 It took me all of 15 minutes to complete. Granted, I didn't stray too far from the template design. I just added the photos, switched up the papers, coloured the elements (like the ribbons and brads), added the stickers and borders, distressed all the edges and added the journaling. The journaling actually took a long time because this is a page about an event I didn't attend and all K and H had to say about it was "It was great!".
Now, here's another Close To My Heart layout using the same template, but crafted in the physical world.
 Now, you'll notice that this is a pretty simple layout. All I had to do was print the photos, trim the photos, ink the edges, trim and ink all the papers, stamp the flowers, colour the chipboard, adhere everything to the page, add the stickers and journaling. I would have stamped the title and stamped some other images on the left side, but it was already so late, I just wanted to get this page into the book. Because it was after midnight. And I'd been working on this page for 3 hours. (Not counting the time I spent trying to get my photos printed.)
So, it's no wonder I'm hooked on Studio J. My new scrapbooking goal is to have my 2010 album completed in classic scrapbooking and my 2011 album completed in Studio J and have both of them finished by December 31, 2012. If I can accomplish it, my annual scrapbooks will only be a year behind! And then I can turn my attention to some albums that haven't been getting enough: my wedding and my heritage albums.
Wish me luck!
Plug: Visit my website to check out more of my Studio J art and buy some great Close To My Heart products! http://www.susanagomes.myctmh.com/
I remember cutting out paper dolls and making them clothes from Christmas wrapping paper. I remember my first typewriter and the stacks of coloured paper I had for different uses: cream for poetry, gray for reports, blue for short fiction, purple for letters. I remember how delighted I was in high school when I found a box of gift wrap from the 1970's and wrapped the covers of my agenda and notebooks in it. And I'll never forget the stationery stores in Seoul with their neat little packages of 2 sheets of paper and coordinating envelope, the gorgeous handmade rice paper (that I taped to the windows for privacy in my curtain less bedroom) and the overflowing bins of amazing pens and markers.
So, of course, I love scrapbooking with paper. And as my husband will attest to, I have a fantastic stash of patterned paper. If you can name a manufacturer I don't have represented in my scrapbooks or my stash, they're probably not available in Canada. It is a huge stash. A monumental stash. A luxurious, inspiring, overflowing, rainbow, jealousy-inducing stash.
And also, of late, a very (sadly) neglected stash.
I have discovered the world of digital scrapbooking.
I won't say I was dragged kicking and screaming into the virtual scrapbooking world, but it was a prolonged, reluctant courtship--that I'm happy to say has blossomed into a loving and wonderful relationship. I love digital scrapbooking. Almost as much as I love paper.
When I became a Close To My Heart Independent Consultant last February, I decided to finally see what all the fuss was about. I signed up for a Studio J membership.
Now, I'm an avid scrapbooker. I average about 3 or 4 hours a week scrapbooking; more if there's a crop that week. And I get a good 3 to 5 pages done per month. Of course, for me, much of my love for this hobby is about the crafting, not necessarily getting pages done, but it is so very satisfying to have completed projects.
For the past few years, my goal has been to never be more than 2 years behind in my annual scrapbooks. And with effort, I've kept up.
Studio J is going to change all that for me. And I'm thrilled!!
I began working in Studio J in mid-February and to date, I have 17 new double-page layouts in my albums and 3 more on the way. That's 17 pages in 3 weeks. Now, I've done 10 pages in 10 days before--but they weren't the most complicated pages, and at the end of it I'd had enough of scrapping and took a few weeks respite. No so with Studio J! I can't get enough. And it's always there waiting for me.
It's an online application that's really easy to use (which is VERY important for someone ask tech-savvy as me--that is to say, not at all) and I can work on my layouts at bit at a time. This has always been my lament with scrapbooking. That I've needed a good chunk of time (at least 2 hours) to make it worthwhile. After all, the first and last half hours are spent getting everything out and then putting everything back. I continue to long for a scrapbooking space of my own where I can just leave unfinished projects on my worktable and not worry about them. Studio J is the next best thing.
My layouts are always there. I can work on them bit by bit--10 minutes here, 5 minutes there--until they are exactly they way I want them. But honestly, it doesn't really take long to create online at all. Here is one of my favourite Studio J layouts.

Now, here's another Close To My Heart layout using the same template, but crafted in the physical world.

So, it's no wonder I'm hooked on Studio J. My new scrapbooking goal is to have my 2010 album completed in classic scrapbooking and my 2011 album completed in Studio J and have both of them finished by December 31, 2012. If I can accomplish it, my annual scrapbooks will only be a year behind! And then I can turn my attention to some albums that haven't been getting enough: my wedding and my heritage albums.
Wish me luck!
Plug: Visit my website to check out more of my Studio J art and buy some great Close To My Heart products! http://www.susanagomes.myctmh.com/
Tuesday, 21 February 2012
Knut!
This page is yet another for the Purple Pumpkin sketch challenge. And thank goodness for sketch challenges because without them, I'm sure I wouldn't get as many pages done as I do. I'm following two challenges religiously, which ensures at least three pages per month.
 This page tells the story of my youngest rascal and his white PJs that have earned him the nickname "Knut"--like the German polar bear.
He has since grown out of these snuggly jammies with feet, but he's still just as cute these days. (And still eating bananas for bedtime snack whenever he can.)
I had a little trouble with the colour scheme for this layout. At first, I thought I wanted all black and white--it did the photo justice--but found it a little more "formal" than this layout should be. So, I switched out the background card stock for Bo Bunny's fabulous Dot to Dot paper in turquoise and I think it lends the little bit of whimsy I was after.
I also love the title stickers: American Crafts Thickers, but in felt. These fuzzy letters give the title the same warmth and softness conveyed in the journaling.
Another lovely 2011 page in the book! God bless sketches!!

He has since grown out of these snuggly jammies with feet, but he's still just as cute these days. (And still eating bananas for bedtime snack whenever he can.)
I had a little trouble with the colour scheme for this layout. At first, I thought I wanted all black and white--it did the photo justice--but found it a little more "formal" than this layout should be. So, I switched out the background card stock for Bo Bunny's fabulous Dot to Dot paper in turquoise and I think it lends the little bit of whimsy I was after.
I also love the title stickers: American Crafts Thickers, but in felt. These fuzzy letters give the title the same warmth and softness conveyed in the journaling.
Another lovely 2011 page in the book! God bless sketches!!
Saturday, 28 January 2012
Rejoice!
I am really enjoying monthly sketch challenges lately. This one from Purple Pumpkin is the latest I've tried my hand at.
When I first saw this sketch, I knew exactly what photos to use. I only had two photos of my son taken at a school celebration and they had been sitting in my photo pile for a while; I wasn't quite sure what to do with them.
Was this meant to be a school page? A religious page? A "when you were seven years old" page? Was it meant for his school days album or for the yearly family album?
When I saw this sketch the pictures and the paper jumped to mind, though I still wasn't sure where this page would find a home.
 |
| Purple Pumpkin January Sketch Challenge |
Was this meant to be a school page? A religious page? A "when you were seven years old" page? Was it meant for his school days album or for the yearly family album?
When I saw this sketch the pictures and the paper jumped to mind, though I still wasn't sure where this page would find a home.
 |
| My take on the sketch. |
Ultimately, I included this page in my son's school days album because the event took place at the school and I also want him to remember that faith development was an important part of his education and that he had a strong Community of Faith around him as he grew up.
My take on the sketch follows the plan very closely (that's what a good sketch is for, after all!), although I admit I had trouble with the proportions. I couldn't crop my focal photo small enough, so my horizontal line is longer than the one in the sketch.
Still, I am very happy with the result! Thanks for the great sketch, Purple Pumpkin!
Wednesday, 25 January 2012
Happy 5th, Saturday Scrappers!
Wow! This month the Saturday Scrappers celebrated their fifth anniversary. That's an amazing run for a scrapbooking group and this one is still going strong. I feel so privileged to be part of this group.
My own Saturday Scrappers anniversary will be in March, when I mark my fourth year with this amazing group of talented ladies (and a few kids!). Without getting too sentimental, I'd like to share what a huge impact this group has had on me.
I first started coming to this group at the invitation of Justine, whom I met through a scrapbooking group on Facebook. I'd chatted with her through the group several times and when I advertised a scrapbooking workshop I was giving, she signed up and brought a friend!
After the workshop, she invited me to Saturday Scrappers and eventually, I got up the nerve to actually go. (Trying new things and meeting new people isn't one of my strengths.) And I'm so glad I did!
That night I met an amazing group of talented and welcoming women who shared my love of scrapbooking and were very nice company. I've often said one of the great benefits of scrapbooking is the sense of community and this group is where I first learned that.
This group isn't only a place where I can have uninterrupted time to follow my passion, it's an amazing source of support and encouragement. Whether I'm working on a project for a contest, coming up with original layouts for submission or just whipping something up for my albums, these ladies can always find something complimentary and uplifting to say about my work. Whether the flattery is deserved or not is beside the point; the encouragement I receive is priceless--especially coming from other scrapbookers.
Even though I've never stayed the full 12 hours (and sometimes it's hard to stay for more than 2 or 3), and I often miss the pot luck dinner, I really enjoy socialising with the ladies of this group and it's nice to just shoot the breeze, catch up with what's been going on and occasionally meet new people.
Saturday Scrappers really has a wonderful thing going.
And one of the hallmark features of this group is a yearly challenge. Whether it's a page exchange, mini-album exchanges, card swaps or the annual Christmas Card Marathon, there's always something exciting happening with this group to inspire scrapbookers. This year, Justine is organising a Page-of-the-Month challenge. Each month she's posting 2 Pagemaps and interested scrappers are creating pages based on them.
This is a great challenge for me, not only because I love Pagemaps, but it has really inspired me to get pages done. I know if I do nothing else in a month, I will get these pages done!
 |
| My first time at Saturday Scrappers, March 1st, 2008. |
My own Saturday Scrappers anniversary will be in March, when I mark my fourth year with this amazing group of talented ladies (and a few kids!). Without getting too sentimental, I'd like to share what a huge impact this group has had on me.
I first started coming to this group at the invitation of Justine, whom I met through a scrapbooking group on Facebook. I'd chatted with her through the group several times and when I advertised a scrapbooking workshop I was giving, she signed up and brought a friend!
After the workshop, she invited me to Saturday Scrappers and eventually, I got up the nerve to actually go. (Trying new things and meeting new people isn't one of my strengths.) And I'm so glad I did!
That night I met an amazing group of talented and welcoming women who shared my love of scrapbooking and were very nice company. I've often said one of the great benefits of scrapbooking is the sense of community and this group is where I first learned that.
 |
| Me displaying my first published layout. (Fall 2010) |
This group isn't only a place where I can have uninterrupted time to follow my passion, it's an amazing source of support and encouragement. Whether I'm working on a project for a contest, coming up with original layouts for submission or just whipping something up for my albums, these ladies can always find something complimentary and uplifting to say about my work. Whether the flattery is deserved or not is beside the point; the encouragement I receive is priceless--especially coming from other scrapbookers.
Even though I've never stayed the full 12 hours (and sometimes it's hard to stay for more than 2 or 3), and I often miss the pot luck dinner, I really enjoy socialising with the ladies of this group and it's nice to just shoot the breeze, catch up with what's been going on and occasionally meet new people.
Saturday Scrappers really has a wonderful thing going.
And one of the hallmark features of this group is a yearly challenge. Whether it's a page exchange, mini-album exchanges, card swaps or the annual Christmas Card Marathon, there's always something exciting happening with this group to inspire scrapbookers. This year, Justine is organising a Page-of-the-Month challenge. Each month she's posting 2 Pagemaps and interested scrappers are creating pages based on them.
 |
| Me with a partially finished page for the January 2012 challenge. |
So, thanks Justine, Kerri, Sault, Angel, Mandy, Cathy, Peggy, Granny, Ilse, Emma, Siobhann, Lori and everyone else at Saturday Scrappers! It's a pleasure knowing you!!
Friday, 13 January 2012
A New Favourite

This is one of my latest pages and it has jumped to the top of my favourites list. There are so many reasons why this is my new favourite page, but I'll just give you the run down on the top 5.
1. I love the paper. The School Spirit line by Crate Paper is fabulous. It has a lot of colour and interest without being girly--which is important to me because almost all my pages are about my boys. I thought the geometric shapes in the background paper were a perfect fit with the science theme of the page.
2. A great title. I struggled with what title to use on this page. Originally, I thought I'd use puffy brown American Crafts Thickers to spell out "Science Centre" or "Little Explorers", but as luck would have it, I'm down to the last q's, x's and z's of that particular set.
 Then I thought I'd just cut out a title from brown cardstock on my Silhouette when I had the time, but after the page sat around for a couple of weeks (I still have to buy a new cutting mat) I knew I had to come up with something else for the title or this page was going to languish for years. (Yes, I do have pages that need die cut titles from years ago waiting for me to do a massive die cut session one day.)
Finally, a few days ago, I realised my darling husband has a colour printer and I could just print something out. That's when I went to the Science Centre website to check out their logo. I found a logo for Kidspark, which is where all the photos are from and the journaling is about. Voila! Perfect title. I just had to print it out, trim it down, ink the edges, mount on brown cardstock and adhere with pop dots. I love the way it fits perfectly onto the page.
 3. Glazed brads. I'm not normally a fan of brads, but I love glazed brads and I couldn't resist stocking up on these Basic Grey glazed brads when I saw them deeply discounted from Ninabrook Designs. Unlike regular brads, which just look like nail heads to me, glazed brads usually have a pattern, rim and epoxy coating. You'll often see glazed brads in packs to co-ordinate with a paper line. Even though I didn't have the co-ordinating papers, I loved these brads and think they fit in well with the colours on this page and add a bit of a whimsical touch. I even added a glazed brad to dress up the title, replacing the purple dot in the "i" with a brad.
4. This page documents a tradition. As a family, we love doing things together and visiting places like the Science Centre and the ROM. I have a lot of pages about these kinds of trips. But for me, and I hope for my children too, going to the Science Centre on the Christmas Break has become an important tradition. After all the Christmas hullabaloo, we take some time for ourselves, to connect as a family doing something everyone enjoys. I documented my feelings about our annual trip in the journaling and I hope when my boys are older they'll look back on these family trips as fondly as I do.
5. This page reconnected me with my old Smith Corona. I have always loved typing. I don't even mind the data entry work I do as an editor because I just love pounding away on a keyboard. (Perhaps if I had any musical inclination, I'd be a pianist.) My old typewriter was retired years ago because I had no use for it once my computer came along. But for whatever reason, I couldn't bear to part with it. It stayed in storage for years and has evaded the occasional mass clean out--including one just this spring that involved Kevin digging out all our old electronics for recycling. I saw him heading out with my old SC and saved it from the scrap pile just in time.
I'm not sure why I did that, because at the time I didn't even know if it worked or that I could purchase typewriter cartridges at Staples. But it went back into my closet all the same. Then this past December, browsing at Staples for something else, I saw a little section devoted to old technology, and there they were: typewriter cartridges. I didn't buy one at the time because I wasn't sure which cartridge my typewriter would take, but Kevin went back a few weeks later and picked one up for me.
That very night, I took SC out of the closet, set it up on my kitchen table and plugged it in. The hum of its motor was like a forgotten lullaby. I sat down, inserted some paper and typed out the journaling for my scrapbook page. It just took a few minutes, but using my old typewriter brought back a flood of memories of all the essays, themes, short stories, poems, resumes and letters I'd written using this old thing.
It sparked my old love for writing, and even though I'm not going to make any promises, I've had some more interesting ideas for a twist in my waiting-to-be-written novel.

Thursday, 29 December 2011
Remember Me?
It's been a long, long while, but what can I say...I've been SCRAPPING!! I've got to face it: writing is a hobby, scrapping is a passion. I've got to follow my heart.
You know I'm a big fan of sketches. For me, they're one of the best ways to get albums completed quickly and beautifully. So, I've been keenly following several blogs for interesting sketches. This month, I noticed a fab sketch (and challenge) on the Purple Pumpkin blog and tried my hand at it!
This is the sketch:
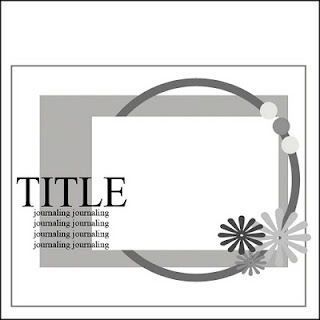

You know I'm a big fan of sketches. For me, they're one of the best ways to get albums completed quickly and beautifully. So, I've been keenly following several blogs for interesting sketches. This month, I noticed a fab sketch (and challenge) on the Purple Pumpkin blog and tried my hand at it!
This is the sketch:

This is my take on it:

I'm pretty loyal to the overall design, but as usual, just following a plan isn't as easy as it's cracked up to be. I had a terrible time wrangling my Silhouette. The shape design feature not longer includes circles (kind of wishing I hadn't installed that last update...) and as usual, it didn't cut all the way through the cardstock. Not a problem on the oval, but I did spend quite a bit of time using my Xacto knife to cut the title.
I used many older products on this page; things that have been waiting in my stash for years. You might recognize the patterned paper as something that was popular in the early part of this century, but I was delighted how it mimics the wall H is leaning against and even has the same colours! It was obvious I had to go with a light blue/green/dark blue colour scheme, even though when I originally looked at the photo, I thought a cream/blue/red colour scheme would work well.
The monogram letters are also an older product. I remember buying them at a scrapbook club when H wasn't even a year old yet. And even though the purple stands out a bit too much, the blue and green letters seemed to be a perfect fit with the papers and the sketch.
The dinosaur assortment, in lieu of flowers, isn't quite as old. You may recognize these embellishment's from the Abbey Road collection from My Mind's Eye. They fit a boy's page better than flowers and support the journaling--which is about my son playing with his dinosaurs.
I'm very happy with how this page has come together. It's a great addition to my 2009 album.
Thanks for putting out the challenge, Purple Pumpkin!
Monday, 6 June 2011
Keep It Simple
Things have been hectic lately and my scrapping projects have been sitting on the back burner. Now that things have calmed down a bit, I look at my pile of "things to scrap" and feel a little overwhelmed. I know I'll never be "caught up", but I don't like this sinking feeling of falling further behind.
That's when I remind myself to keep it simple.
I have tons of sketches, websites and even kits to turn to for inspiration and fast assembly.
One of the easiest ways to get pages done, is to turn to what you've done before.
I always try to have my son's "school days" scrapbook pages completed before the next school year starts, but now with two boys in school, I'm finding it difficult to keep up. When it came time to scrapbook their school portraits pages, I knew what I wanted to do for one, but was having trouble coming up with an idea for the other.That's when my favourite mantra, "Keep it simple", popped into my head. These pages were going into two different albums, they weren't going to be side-by-side, so why not use the same layout for both pages? Voila! Problem solved.


And I'm very happy with the results. These pages were quick to assemble, look sharp and are great additions to both boys albums.
Another way to keep it simple is to maximize the use of sketches. For years I've been using sketches. They are one of the greatest tools in my scrapping toolbox. Whether I'm following them exactly, doing my own variation or simply as an inspirational starting point, sketches have influenced a huge number of my completed pages. But with so many takes on sketches, why was I using a sketch only once then moving on to the next one?
It wasn't until I purchased a copy of Becky Fleck's Pagemaps that it sunk in that I could use these pagemaps over and over--really, the variations are infinite!
So, when I was ready to scrap the photos from my son's second birthday and was feeling a little uninspired, I flipped through my albums looking for pages with a similar number of photos. That's when I came across this layout based on a Becky Fleck pagemap:
 I remembered putting this page together a year or so before and I liked how the photos were grouped together and the side bars of patterned paper. I knew the birthday layout was going to be very colourful and energetic and I thought the sidebars would frame the photos well.
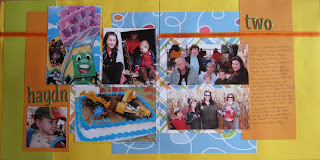 The result looks very different from the original layout, and even more so from the original sketch, but the page turned out well and came together very quickly once I decided to follow the previous layout.
Keeping things simple when creating my scrapbook pages always yields great results!
That's when I remind myself to keep it simple.
I have tons of sketches, websites and even kits to turn to for inspiration and fast assembly.
One of the easiest ways to get pages done, is to turn to what you've done before.
I always try to have my son's "school days" scrapbook pages completed before the next school year starts, but now with two boys in school, I'm finding it difficult to keep up. When it came time to scrapbook their school portraits pages, I knew what I wanted to do for one, but was having trouble coming up with an idea for the other.That's when my favourite mantra, "Keep it simple", popped into my head. These pages were going into two different albums, they weren't going to be side-by-side, so why not use the same layout for both pages? Voila! Problem solved.


And I'm very happy with the results. These pages were quick to assemble, look sharp and are great additions to both boys albums.
Another way to keep it simple is to maximize the use of sketches. For years I've been using sketches. They are one of the greatest tools in my scrapping toolbox. Whether I'm following them exactly, doing my own variation or simply as an inspirational starting point, sketches have influenced a huge number of my completed pages. But with so many takes on sketches, why was I using a sketch only once then moving on to the next one?
It wasn't until I purchased a copy of Becky Fleck's Pagemaps that it sunk in that I could use these pagemaps over and over--really, the variations are infinite!
So, when I was ready to scrap the photos from my son's second birthday and was feeling a little uninspired, I flipped through my albums looking for pages with a similar number of photos. That's when I came across this layout based on a Becky Fleck pagemap:


Keeping things simple when creating my scrapbook pages always yields great results!
Friday, 15 April 2011
Say What?
We all know a picture is worth a thousand words. That is until you forget where you were, when it was or even who is in the picture. For the scrapbooker, forgetting the details of your photos poses an acute problem and I've witnessed scrappers spending hours trying to sort and organize photos they can no longer remember the story behind.
At the same time, many scrapbookers don't see the value in journaling on their pages. Some say they're intimidated by journaling, others that they just don't have anything to say. But I say, once you think about the reason you're scrapping those photos in the first place what you should journal is obvious: it's the thing you find special.
Whether it's a single sentence, a few lines or an entire typewritten page, the stories behind your photos will convey the meaning of those photos to those lucky viewers of your albums.
Asking yourself "W5H" is a great way to get journaling started:
* Who is in the photos? Who took the photo? Who is missing from the photo?
* What are the photos of? (An occasion? A tradition? An activity?) What does the photo show or hide?
* Where were the photos taken? What is the significance of the place or objects in the photo?
* Why these photos? (i.e Why the one close up of the bouquet instead of a the bride holding it?) Why not other photos?
* When were the photos taken? When was the journaling done? When in your life, or the subject's life was the photo taken?
* How does the photo make you feel? How well does the photo capture the moment? How often do you think of or look at the photo or the subject?
If you answer one or two of these questions, or similar ones, you're well on your way to telling the stories behind your photos.
Whatever you decide to include in your journaling, there are a few things every page should have: a date and identification. Even if it's something as vague as "Spring 2011", dating your pages will put your page in a timeline context, and for the chronological scrapbooker, will make ordering your pages easier. Identifying your subjects may seem repetitive and unnecessary (after all you're not going to forget who your children or your parents are) but I've seen lots of people forget which baby it was in a particular photo or the names of their grandparents. If you have that information, even if it seems irrelevant, include it for the people who may not know your subjects as well as you do.
And if you're still not sure whether journaling is for you, remember this:
"And by the way, everything in life is writable about if you have the outgoing guts to do it, and the imagination to improvise. The worst enemy to creativity is self-doubt."
~Sylvia Plath
At the same time, many scrapbookers don't see the value in journaling on their pages. Some say they're intimidated by journaling, others that they just don't have anything to say. But I say, once you think about the reason you're scrapping those photos in the first place what you should journal is obvious: it's the thing you find special.
Whether it's a single sentence, a few lines or an entire typewritten page, the stories behind your photos will convey the meaning of those photos to those lucky viewers of your albums.
Asking yourself "W5H" is a great way to get journaling started:
* Who is in the photos? Who took the photo? Who is missing from the photo?
* What are the photos of? (An occasion? A tradition? An activity?) What does the photo show or hide?
* Where were the photos taken? What is the significance of the place or objects in the photo?
* Why these photos? (i.e Why the one close up of the bouquet instead of a the bride holding it?) Why not other photos?
* When were the photos taken? When was the journaling done? When in your life, or the subject's life was the photo taken?
* How does the photo make you feel? How well does the photo capture the moment? How often do you think of or look at the photo or the subject?
If you answer one or two of these questions, or similar ones, you're well on your way to telling the stories behind your photos.
Whatever you decide to include in your journaling, there are a few things every page should have: a date and identification. Even if it's something as vague as "Spring 2011", dating your pages will put your page in a timeline context, and for the chronological scrapbooker, will make ordering your pages easier. Identifying your subjects may seem repetitive and unnecessary (after all you're not going to forget who your children or your parents are) but I've seen lots of people forget which baby it was in a particular photo or the names of their grandparents. If you have that information, even if it seems irrelevant, include it for the people who may not know your subjects as well as you do.
And if you're still not sure whether journaling is for you, remember this:
"And by the way, everything in life is writable about if you have the outgoing guts to do it, and the imagination to improvise. The worst enemy to creativity is self-doubt."
~Sylvia Plath
Friday, 1 April 2011
Tried and True
Clearly, I'm a fan of sketches. But even using those can be a burdensome drain on my sensibilities when I'm scrapping late at night or in a rush to get pages done. Looking over my albums, I find there's one tried and true layout I come back to again and again when I want a simple photo-focused page: the gap grid.
Quite simply, this layout is a grid of multiple photos, in the same or various sizes, with a 1/4" gap between the pictures. I usually use an over sized mat to accommodate all the photos and sometimes the title.
I discovered this layout early on and have used it repeatedly because of the sleek, uncluttered look as well as the fairly short time it takes to assemble the page. It works for single and double page layouts and is a great way to keep the photos the centre of attention.
If you're looking to try something new or are looking to put together a big-impact page in a short amount of time, try the gap grid!
Quite simply, this layout is a grid of multiple photos, in the same or various sizes, with a 1/4" gap between the pictures. I usually use an over sized mat to accommodate all the photos and sometimes the title.
I discovered this layout early on and have used it repeatedly because of the sleek, uncluttered look as well as the fairly short time it takes to assemble the page. It works for single and double page layouts and is a great way to keep the photos the centre of attention.
 |
| My first page using a gap grid. The gaps and colour scheme make the photos pop off the page. |
 |
| Inspired by a layout I saw in SBE, this small gap grid keeps the photos the focal point against the busy background. |
 |
| With whimsical florals and stitching details, the strong geometrics of this gap grid add a masculine balance to the page. The impact of a large block among the rounded elements is softened by a popped-up floral title which covers some of the negative space between the subjects of the photos. |
 |
| Photos are the star of this simple, quickly assembled page. The mismatched title tiles match the playful theme of the page and journaling along the perimeter of the grid completes the story. |
Friday, 25 March 2011
An Eggcellent Idea!
 |
| 12" x 12" double page layout based on a Pagemap. |
I would like to take credit for the idea behind this simple embellishment because I thought it up all by myself while pondering what to do with the stack of new stamps and inks I'd just purchased, however, I know someone, somewhere, before me, has done something similiar, if not identical. So, while this technique is entirely new to me and I feel very clever for working it out, if you've seen it somewhere before, please just smile and shake your head.
Stamped Easter Egg Embellishment
YOU WILL NEED:
paper (I used white cardstock)
stamps (I used Kelly Panacci border stamps)
ink (I used Tsukineko Dew Drops)
ribbon (I used Offray stitched grosgrain)
craft knife or hole punch
STEP ONE:
Draw an oval on the reverse side of the paper.

Turn your paper over and stamp images. I used border stamps to create stripes, but your egg will look great with any repeat pattern stamp.

STEP THREE:
When the ink is dry, cut out the egg following the lines of the oval drawn earlier.
STEP FOUR:
Ink the edges of the egg (on the stamped side) and admire your pretty egg while it dries.

STEP FIVE:
With a craft knife or hole punch, make 2 slits or holes at the top of the egg approximately 1/2 inch apart.
STEP SIX:
Slip the ribbon through the slits or holes, through the font, then turn over and slip the ribbon through the opposite slit or hole. Trim ribbon ends.


That's it! Use your lovely egg for embellishments on scrapbook layouts and cards. To create a journaling spot, leave the centre area of the egg clear when stamping.
 |
| 4" x 5.5" card. |
 |
| 12" x 12" double page layout based on a Pagemap. |
If you make your own Easter eggs, post a link to a picture of them!
Happy Scrapping!
Friday, 18 March 2011
Then and Now
Scrapbooking can be intimidating. Often when you see someone else's scrapbook, what you notice more than the cute pictures and funny stories is the artistry of the page and you imagine the person who created it has an amazing, innate talent. I'm a testament to the fact that's not always true. I'd even argue that it's rarely true.
As with any other art or craft, skill at scrapbooking develops over time. Early pages (and entire albums) are like first drafts where ideas, style and technique are being explored and developed. If you're like me, you may look back over your first projects with a mild embarrassment and a sense of "if I only knew then". But of course, that's the point: you didn't know then and it took you a bunch of pages to figure it all out.
My first scrapbook pages are rudimentary and awkward. There isn't much in terms of style going on and they're only distinguished from traditional photo albums by patterned paper and stickers.
It wasn't very long after I first began scrapbooking that I met a Creative Memories consultant. Like many newbies, I thought Creative Memories was the answer to my prayers and giddily browsed the catalogue making a long wish list of things I desperately needed to transform into a "real" scrapbooker. It was also through Creative Memories that I first learned about scraplifting.
Now, I come from the publishing world where we call copying someone else's work plagiarism and it's a serious offence. Students are expelled from universities and writers are sued for copyright. But in the scrapbooking world, copying someone else's work to create your own piece of art is entirely acceptable. You should give credit where's it's due and not present it as an original work (like if you're submitting to a magazine), but generally speaking, scraplifting is OK.
I'd even go further than that and say scraplifting is a great way to hone your craft, build your confidence and get pages done.
My Creative Memories consultant turned me onto Fast Formulas which is a basic step-by-step guide to building pages with CM product. I thought it was great! My pages were more interesting and I was turning out a lot of them.
It wasn't until I discovered scrapbooking magazines that I really began to understand the scope of what I could be doing. Friends were kind enough to lend me back copies from their stash and I picked up the odd copies of Scrapbooks Etc., Making Memories and Creating Keepsakes. These magazines opened up a whole new world to me and set me on a new path. I became an avid scraplifter (still am, actually) and as my tally of completed pages increased, so did my skill level. I began tackling new techniques and taking on challenges I never would have thought of trying back in my sticker days.
These days, I'm a subscriber to two scrapbooking magazines and a host of newsletters and websites that provide me with daily inspiration. There's always something new and innovative to learn; always a new twist on an old technique; and always a rich community of talented scrapbookers to look to for guidance. Whether you're new to scraplifting or have been doing it for a while, there are lots of places to go to inspire you in your next project.
I have to put in a plug for my favourite scraplifting site: PageMaps. Becky Fleck is a scrapbooking Goddess and the resource she has created on this website is invaluable. It's the first place I go to when I'm stuck and I look forward to the new pagemaps every month.
However your scrapbooking style has changed over time and however your skills have improved, be sure to look back over your early pages and remember though there may be some things that could be improved, those early pages are still beautiful and precious.
I wouldn't change a thing.
As with any other art or craft, skill at scrapbooking develops over time. Early pages (and entire albums) are like first drafts where ideas, style and technique are being explored and developed. If you're like me, you may look back over your first projects with a mild embarrassment and a sense of "if I only knew then". But of course, that's the point: you didn't know then and it took you a bunch of pages to figure it all out.
My first scrapbook pages are rudimentary and awkward. There isn't much in terms of style going on and they're only distinguished from traditional photo albums by patterned paper and stickers.
 |
| My very first scrapbook page. I used purchased ribbon die cuts, but didn't realize until I photographed the page for this blog, that the die cuts are meant to fit together to create 3-dimensional bows. |
 |
| My second scrapbook page. Notice the resemblance to a traditional photo album and the conspicuous absence of a title or journaling. |
Now, I come from the publishing world where we call copying someone else's work plagiarism and it's a serious offence. Students are expelled from universities and writers are sued for copyright. But in the scrapbooking world, copying someone else's work to create your own piece of art is entirely acceptable. You should give credit where's it's due and not present it as an original work (like if you're submitting to a magazine), but generally speaking, scraplifting is OK.
I'd even go further than that and say scraplifting is a great way to hone your craft, build your confidence and get pages done.
My Creative Memories consultant turned me onto Fast Formulas which is a basic step-by-step guide to building pages with CM product. I thought it was great! My pages were more interesting and I was turning out a lot of them.
 |
| A layout based on a Creative Memories Fast Formula. (It's got a title, but still no journaling.) |
 |
| Based on a layout from Scrapbooks Etc. This was the first time I hand cut a title (from a trimmed portion of a photo showing leaves), used a tag and included writing (a poem about autumn). This is my "I've turned a corner" layout. |
 |
| My latest layout. Based on a pagemap from Scrapbooking PageMaps 2. |
I have to put in a plug for my favourite scraplifting site: PageMaps. Becky Fleck is a scrapbooking Goddess and the resource she has created on this website is invaluable. It's the first place I go to when I'm stuck and I look forward to the new pagemaps every month.
However your scrapbooking style has changed over time and however your skills have improved, be sure to look back over your early pages and remember though there may be some things that could be improved, those early pages are still beautiful and precious.
I wouldn't change a thing.
Saturday, 12 March 2011
So long and thanks for all the brads!
It's depressing. When I started scrapping seven years ago, my first experience in a scrapbook store was on its closing night liquidation sale. At the time I didn't realize local scrapbooking stores were on their way out.
Fast forward a couple of years and there are two thriving scrapbook stores close by as well as the big box chain--you know the one I mean. They were great. I'd run low on cardstock and pop in for some Bazzil basics and come out with a bag full of the latest goodies. It was a joyful experience. Spending an hour or more browsing through the papers, admiring the different chipboards, felts, ribbons, inks, stamps, stickers and trinkets. Leafing through the final sale paper bins one sheet at a time and finding little treasures at 90% off.
Then a couple of year ago, I discovered the joys of online shopping. A whole new world opened up! I found online stores from Quebec, British Columbia, Manitoba and some "local" stores in Kitchener and southern Ontario. These were great, particularly the out of province stores, because of the unfamiliar lines of paper and products. The French lines in particular, which I haven't found available anywhere else, had fantastic and creative designs I had never seen before.
But those days are in the past. The local scrapbooking stores are gone. Only the big box craft store remains. And my favourite online stores are dropping like flies. I was particularly upset by the closure of www.monscrapbook.com. This online store offered a fantastic variety of product and ideas for projects. It also had the best customer service of any scrapbook store I've dealt with--online or in person.
But more than the loss of places to "get my fix", I mourn the loss of the communities around these stores. The online galleries and forums, the local scrap nights, the knowledgeable and creative owners and saleswomen, the beautiful projects and fun classes. It's not just part of the retail market that has been lost, it's a wound to the sisterhood of scrapbookers; a sisterhood that draws many for the community, support and friendships we find there. I think this community is at the heart of why scrapbooking is so popular. It's not just a hobby, it's not just a solitary activity (though it can certainly be those), it's a gathering of women for sharing, learning, creativity and pleasure.
So, when we lose our scrapbook stores, we're not only losing part of that community, we're losing the nucleus of the community--the place where we gather, meet one another and learn new things. If it weren't for the defunct stores The Scrapbook Academy and Scrapbook Emporium I wouldn't have met half the wonderful women and talented scrapbookers I know today.
So, the moral is: support your local scrapbooking store and take advantage of the community in your area.
My Links
Here's a short list of my favorite online shopping sites:
Ninabrook Designs
eyeletcanada.com
The Scrapping Bug
Scrapbooks and Smiles
The Crop Stop
Sassy Scrapping
Fast forward a couple of years and there are two thriving scrapbook stores close by as well as the big box chain--you know the one I mean. They were great. I'd run low on cardstock and pop in for some Bazzil basics and come out with a bag full of the latest goodies. It was a joyful experience. Spending an hour or more browsing through the papers, admiring the different chipboards, felts, ribbons, inks, stamps, stickers and trinkets. Leafing through the final sale paper bins one sheet at a time and finding little treasures at 90% off.
Then a couple of year ago, I discovered the joys of online shopping. A whole new world opened up! I found online stores from Quebec, British Columbia, Manitoba and some "local" stores in Kitchener and southern Ontario. These were great, particularly the out of province stores, because of the unfamiliar lines of paper and products. The French lines in particular, which I haven't found available anywhere else, had fantastic and creative designs I had never seen before.
But those days are in the past. The local scrapbooking stores are gone. Only the big box craft store remains. And my favourite online stores are dropping like flies. I was particularly upset by the closure of www.monscrapbook.com. This online store offered a fantastic variety of product and ideas for projects. It also had the best customer service of any scrapbook store I've dealt with--online or in person.
But more than the loss of places to "get my fix", I mourn the loss of the communities around these stores. The online galleries and forums, the local scrap nights, the knowledgeable and creative owners and saleswomen, the beautiful projects and fun classes. It's not just part of the retail market that has been lost, it's a wound to the sisterhood of scrapbookers; a sisterhood that draws many for the community, support and friendships we find there. I think this community is at the heart of why scrapbooking is so popular. It's not just a hobby, it's not just a solitary activity (though it can certainly be those), it's a gathering of women for sharing, learning, creativity and pleasure.
So, when we lose our scrapbook stores, we're not only losing part of that community, we're losing the nucleus of the community--the place where we gather, meet one another and learn new things. If it weren't for the defunct stores The Scrapbook Academy and Scrapbook Emporium I wouldn't have met half the wonderful women and talented scrapbookers I know today.
So, the moral is: support your local scrapbooking store and take advantage of the community in your area.
My Links
Here's a short list of my favorite online shopping sites:
Ninabrook Designs
eyeletcanada.com
The Scrapping Bug
Scrapbooks and Smiles
The Crop Stop
Sassy Scrapping
Friday, 4 March 2011
A Brave New World!
In 2010, I set myself the goal of having a scrapbook layout published in a magazine. I entered contests, submitted to calls and after what seemed like many, many failed attempts, my first layout was accepted at Canadian Scrapbooker Magazine. "Orono Fair" appeared in the Fall 2010 issue. What a rush! It was just as thrilling as seeing my name in print the very first time when I had a short story published back in high school.
 |
| "Orono Fair" 12" x 12" double layout published in Canadian Scrapbooker Fall 2010 |
Through the winter I continued to submit to magazines and am very happy to have two more layouts published in Canadian Scrapbooker: "Mother's Day 2010" is currently appearing in the Spring 2011 issue and "Scraptacular" will appear in the Summer 2011 issue. Back to back issues! That's a rush too.
 |
| "Mother's Day 2010" 12" x 12" double layout published in Canadian Scrapbooker Spring 2011 |
 |
| View of inside of flap with additional photos and journaling. |
But the bloom has started to fade. Just as when I dabbled in fiction and poetry, I find the reality of a newcomer publishing in magazines a little disappointing. Of course, I love being published. I love sharing my work and having friends compliment me. And I love the emails of congratulations from people in the industry whom I admire. But I do not love the strain on my wallet. It costs me about $16 to send off my layout to be photographed and the "author's payment" is a free copy of the issue the layout appears in. A free copy of a magazine I already subscribe to. (It's all right though--I've got 2 kids, so each will inherit a copy.)
That isn't a criticism of the magazine, by the way. Payment in copies is standards and I'm sure they're working themselves to the bone to produce the magazine and would pay in cash if there were enough of it to go around. There's a reason artists are starving after all.
But my recent experiences have led to me reconsider what "scrapbook publishing" means to me.
I've also gotten a guilty nudge from friends in the writing community I was once a part of. I said I would go back to writing.
So, why not merge the two?
A blog! About scrapboooking. Where I can share my work and thoughts; be a writer and a crafter at the same time.
So, here it is. My first blog. It's a whole new world for me!
Subscribe to:
Posts (Atom)